Monday, September 27, 2021

Have an Idea for an App but Want to Make Sure it Looks "Professional"?


Maybe you have a great idea for a no-code app but you're not sure you can make it look "professional" enough. One answer is to try starting from an app template. Most no-code platforms offer at least some customizable templates that provide well-designed page layouts and a slick-looking user interface. Bubble for example has dozens of templates available and you can additional samples on Zero Quode (www.zeroquode.com).

Keep in mind, you don't have to find an exact match with the application you're planning. One of my favorite examples is Caspio's "patient portal" template (https://www.caspio.com/apps/patient-portal/).  It's designed as a communications center for doctors and their patients and includes:

  • A new patient registration form
  • Patient and medical personnel login pages
  • A patient profile page
  • A patient information page (showing the patient's prior visits along with any doctor's notes and recommendations)
  • Message center for exchanging messages between doctors and patients
  • A doctor's dashboard showing data such as visits and messages by patient and a chart of patients by medical status
  • A patient list page where each doctor can see view details on the status of each of their patients
That same design can be used for other applications though. For instance if you wanted to build an app for a fitness center that offers guided fitness plans for members. You could use the same basic layout except that:

  • The new patient form becomes a new member form
  • The login pages are for members and fitness center staff members
  • The message center allows a member to exchange messages with the personal trainer assigned to them
  • The patient (or "member") information page shows each visit to the center by that member and what they did on that visit (what exercises, number of reps, dietary notes, etc.)
  • And the doctor's pages become the pages for the center's personal trainers or "fitness counselors".
You can use a similar approach to almost any app, you just need to find a template that covers the same basic functions as the application you want to build. Some of the templates available for no-code projects are free, others may cost a few dollars or a few hundred dollars. In the long run even an expensive template may be worth the investment if it saves you considerable time and effort and provides the professional look you want for your application. Check out a few of the ready-made templates available online and see if one of them can work for your project.

Tuesday, September 21, 2021

A Quick List of No-Code Pros and Cons

OK, you're debating about whether or not to develop a new app using a "no-code" platform - is it a viable option or not? Well, here are a few "pros and cons" to consider:

  • Pro - In almost every case no-code platforms offer a much less expensive way to create a usable application than paying a software firm to build the app. The initial cost involved in hiring traditional programmers can be dozens of times more expensive than with no-code or "visual programming" and there's a tendency in any software project for costs to creeping upward as changes and additions become necessary.
  • Pro - If you have someone in your organization build the app (or if you have an independent developer build it and teach one of your people how to do it) you retain complete control over the application. If changes need to be made you can do it yourself.
  • Pro - Since a modification to the application is usually as simple as plugging in a different "block" of code, feedback from end users can be almost immediate, reducing the time it takes to complete the app (although the time spent in planning and designing the app is probably about the same whether you're using no-code or traditional programming).
  • Con - The app is tied to the platform it was built on. No-code programs aren't transferrable from one platform to another (although the documentation covering the app's design and logic are transferrable). 
  • Pro - Apps can be created and tested much faster with no-code because you're simply connecting pre-built "blocks" of code rather than coding the program from scratch. 
  • Pro - You're not alone in trying to put your project together. Many no-code platforms have a large and enthusiastic community of users who can provide assistance if needed.
  • Con - Since apps are tied to the platform on which they're created, that means (in almost every case) that you're going to have to pay a monthly or annual fee to continue to run your app on that platform. However, there's a considerable range in how much you're going to have to pay - the fee may be $30 a month or $3,000 a month.
  • Pro - Most no-code platforms offer "plug-ins" and API connectors that let you extend the capabilities of the platform by "plugging in" chunks of custom code or connecting to outside services like Stripe or Google Maps. 
  • Pro/Con - Security can be a cause for concern with no-code apps (the same as it is with traditional programming). The fact that the actual program code is hidden makes it difficult to judge how secure the code really is (although there are some software products you can use to scan even a no-code app for vulnerabilities. Plus, creating app on a no-code platform is definitely more secure than having employees creating scripts and macros in an Excel spreadsheet to work with that same data.
OK, there are a few things to consider for anyone contemplating using a no-code app development platform. One last thing to consider though - the number of individuals and organizations using no-code has grown enormously in the last few years and is continuing to grow every day.

Saturday, September 18, 2021

An Additional Note on Data Visualization

 I came across a really good blog post on data visualization that I wanted to share with you. It's on the Data Pine blog at: https://www.datapine.com/blog/how-to-choose-the-right-data-visualization-types/. The title is "Designing Charts and Graphs: How to Choose the Right Data Visualization Types", by Sandra Durcevic, posted on May 2nd, 2019. 


Friday, September 17, 2021

Data Visualization with Bubble


One of the common "buzz" terms in the digital world these days is "data visualization". What exactly does that mean? The standard definition is "the graphical representation of data and information". Basically, data visualization is an extension of the old saying "a picture is worth a thousand words". We tend to be visual learners and to see trends and patterns much more easily when the data is presented visually in charts and graphs.

So how do you, as a no-code developer, handle data visualization on your favorite platform? Bubble's chart and graph elements offer a good example of how to present data visually in a no-code app. There are all kinds of charts and graphs that can be used to display data including: bar charts, area charts, stacked bar graphs, line graphs, scatter diagrams, pie charts, and Gantt charts and Bubble has "plug-ins" to let you make use of almost all of these. 

As an example of how to use Bubble's "Chart Element" plug-in, here's an excerpt from one of my books that involved a "To-Do" app where tasks could be assigned to different users:

  • One of the changes we want to make to the To-Do app is to add a new page with both a list view of the current tasks and a chart view. To get started, click on the Plugins” tab, search for Bubble's “Chart Element” plugin and install it, then add a new page and name it "chart-view".

  • Drag a repeating group onto the page and position it on the left half of the page, then add a chart element and position it on the right half of the page.

  • Double-click the repeating group to open its property editor and set it to 4 rows of data. Then Build the expression “Search for Todos:grouped by”  in the “Data source” field. 

  • At this point a “Group By” box will display. Click “+ Add a new grouping”, set “Field 1 to group by” to “Assigned To” and click on “+ Add a new aggregation”. Set the “Aggregation 1” function to “Sum” and set the “Field to calculate on” to “Assigned To”. Now the property inspector for the repeating group should look like this:


  • Next, double-click the chart element to display its property editor and set its “Chart type” to “Bar”. The rest of the setup for the chart element is almost the same as for the repeating group. The property editor for the chart element looks like this:


  • Note: The “Group By” function is an important one when you're building different views of the data in the database. As stated in the Bubble documentation, this function “Groups the list into chunks of related entries, and computes summaries of each group.”. In this case, we grouped the Todo's by user and calculated the sum of the hours to-date for each user.
Once these two elements are set up, the chart-view page looks like this in preview:


The listing on the left and the chart view on the right both tell you how the tasks are divided among the three users, but the chart view is definitely quicker and easier to absorb at a glance. That's the advantage of "data visualization" in your app - and this example shows how easily you can include this type of view in your application.

Tuesday, September 14, 2021

Connecting Airtable to AppGyver

I created a "reminder" app called "Memory Bank" on AppGyver a while back and I used local (client-side) storage as the data source for the application. That works alright if you want the app owner to be the only person accessing the app's data. If you want to share data with other people though, you need to use a server-side database like Airtable. I already had an account on Airtable so I decided to try creating a database there and connecting it to Memory Bank.

Here's the process I went through to modify Memory Bank:

  • I went into my Airtable account and created a new base (called "Memory Bank") and made several entries:


  • I had already built a "Memory Bank" application on AppGyver, so I headed on over to AppGyver and opened that app.  
  • The first step in connecting my app to Airtable was to click on "Data" at the top of the Composer Pro page in AppGyver and select to create a "REST API direct integration source." 
  • That took me to this screen:


I named the data resource "Reminders", which left 2 fields to fill in: the URL for my data source (in Airtable) and the authorization code required by the Airtable API. To find those two pieces of information I went to the Airtable API documentation and selected my Memory Bank app. The format of the "Resource URL" is always "https://api.airtable.com/v0/" plus the ID for your Airtable base. Once you select your base and go to the API "Introduction" page, you'll see the ID for your base:


Add that ID onto the end of the standard part of the URL and you've got your resource URL: https://api.airtable.com/v0/appLDk6vjj0I4wUXI/Reminders

  • To get the API key I opened my Memory Bank base, clicked on "Account" and selected to generate the API key for Memory Bank. Once I had that key I clicked on "HTTP Header" on the AppGyver screen above, typed in "Authorization" as the key I was creating, "Auth" as the label, and pasted my API key into the "Value" field.
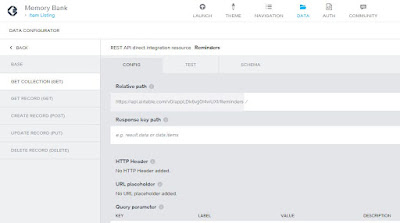
  • Next, I clicked on "Get Collection" tab on the left side of the screen, which brought up this page:


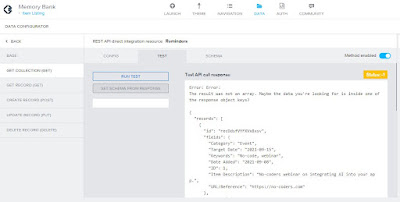
 The "Relative path" is already filled in for you. AppGyver defines the "Response key path" as the "path to the key containing the relevant data in the response". I wasn't sure what that meant, so I decided to just go ahead, click on the "Test" tab, select "Run test" and see what would happen. 

  • What happened was an error message: "The result was not an array. Maybe the data you're looking for is inside one of the response object keys?". At first that didn't exactly clear things up for me, but after looking at it for a while it occurred to me that the message was saying that it had received an object rather than an array of data records - and yes, my 3 records from Airtable were there inside the "records" object:


I would like to say that I immediately knew what to do to fix the problem, but the truth is that I fumbled around for a while until I went back to the "Get Collection" config screen and entered "records" in the "Response key path" field. Once I did that and re-ran the test I got just the array of data records from Airtable. 

  •  Next, I clicked the "Set schema from response" button so that AppGyver would use the same configuration to accept data requests from Airtable. Then I opened my Memory Bank app in AppGyver,  added a "Reminders" data variable to my record listing page and tied the display elements on the page to the new data variable. 
  • Finally, I launched Memory Bank on AppGyver and navigated to the listing page, which looked like this:


And there were my 3 entries from Airtable...

Of course there's more to connecting external sources to AppGyver, but this should give you the basic idea of how to use an API to exchange data with an external database. Also, if you're interested you can see how I developed the Memory Bank application in AppGyver in my book: "Building a Visual Programming (No Code) Mobile App on Adalo, AppGyver, Glide, GoodBarber, Honeycode and Mendix".

Tuesday, September 7, 2021

What Kind of Apps do People Build with No-Code?

If you've ever wondered what types of apps other people build using no-code platforms, here's a list of some of the templates you can find on no-code sites:

  • How to design a mobile app - a template demonstrating how to create a simple but sophisticated mobile app with Bubble. It includes a loading page, a landing page, sign up and sign in pages, and a 5 page app design with headers and footers.
  • A travel app that booking websites could offer their customers. The app allows users to search for hotel accommodations, vehicle, bike or boat rentals, guided tours, and interesting places to visit. In addition built-in APIs let you book airline tickets and other reservations online.
  • An app template for dog sport enthusiasts - people who participate in canine agility, lure coursing, dock jumping, flyball and others. Users can view stories and photos from other handlers, upload their own stories, keep track of upcoming events, and even make travel plans right on the app.
  • A template that provides brand names of food products that are good choices for people with heart problems. In addition the app can contain tips on exercise and stress-relieving activities, local aid and support groups, and the latest news affecting those with cardiovascular concerns.
  • Comprehensive help with starting your own business. An app that is constantly updated with the latest information by state on how to register a new business, federal, state and local tax regulations, tips on hiring employees, marketing products and services, accounting requirements, and names, addresses and phone numbers of state and local agencies that a new business owner may need to know.
  • A "dating" app, but for people who are simply looking for a friend - someone local who shares their interests and would like to go places together. There are people, especially senior citizens, whose family and friends are no longer around and who would like to get out more, but don't want to go alone.
  • Language learning buddies - an app that lets you connect with others who are interested in learning a new language so that you can practice talking and/or texting to each other in that language.
  • Neighborhood job board - post jobs, offers of services, recommendations, even offers to barter services for services. Help keep more business close to home.
  • An analytics app, with each version designed for a specific client to highlight the most important data affecting their operation.
There are still lots of other possibilities for mobile apps that can find a market out there in the world. Hopefully one or two of these ideas can help you find a niche and get started building an app of your own.

Tuesday, August 31, 2021

No-Code Training Boot Camps

There are plenty of no-code training videos out there, but what if you learn best in a guided study environment? Many people focus better in a class setting, so where can you find a no-code programming camp? 

Here are a couple of options:

  • The Canvas No-Code Programming Bootcamp - This free bootcamp uses Bubble's no-code platform to teach students how to create even complex web apps. It's taught by Airdev, a major development firm, and allows you to proceed at your own pace, working through a series of videos and challenges that show you how to build a full web application in just a few weeks. You can also get help from the community if you get stuck.
The camp curriculum covers both Bubble and Canvas, a framework designed to work with Bubble (one of the most advanced visual programming platforms on the Internet). There are four sections to the course: Introduction to Bubble (2 hours), Bubble Basics (12 hours), Introduction to Canvas (22 hours), and API & Canvas (18 hours). You can find more information at: https://canvas.airdev.co/bootcamp

  • MVP Bootcamp by No Code MBA - An online bootcamp designed to teach you how to build, launch and make money with your no-code apps. The camp includes 6 weeks of training on building an app, along with advice on creating an effective business model. Time commitment is 2 hours per week of online instruction, and a recommended total of 4 hours of offline work per week. 

Also included are weekly meetings to discuss the progress of your project and to review videos and articles pertaining to monetizing your app. In addition you get lifetime access to the bootcamp community forum, along with personal assistance from your instructor and peers in your cohort.

Pricing is quoted as being $1990 although the first cohort to go through the bootcamp will only pay $750 (no information on whether or not a group has already been assembled for the first camp). For more details go to: 

https://www.nocode.mba/bootcamp-mvp#faqs

  •  MillionLabs.co.uk - MLabs offers an 8-week no-code camp focused on business applications and learning how to use Bubble (www.bubble.io). The course covers esponsive UI design, workflows, data architecture, advanced bubbling skills and integrating external services through plugins and APIs. Pricing for the bootcamp is listed as starting from $600. Get more information at: https://millionlabs.co.uk/bootcamp.
  • Bubble.io - Bubble offers their own bootcamps, providing 3 different types: A course in fundamentals (4 sessions in 4 weeks), a bootcamp on building and launching your own product idea (8 sessions in 8 weeks), and an advanced course for professionals (8 sessions in 8 weeks). Prices generally range from $600 to $800. Go to https://bubble.io/bootcamps for more information.